Tournament brackets looks very nice if they're done right. In this post I will show you how you can very easy create your own brackets with only Flexbox, combine this technique with maybe React and you'll have a very powerful UI to do whatever you want with.
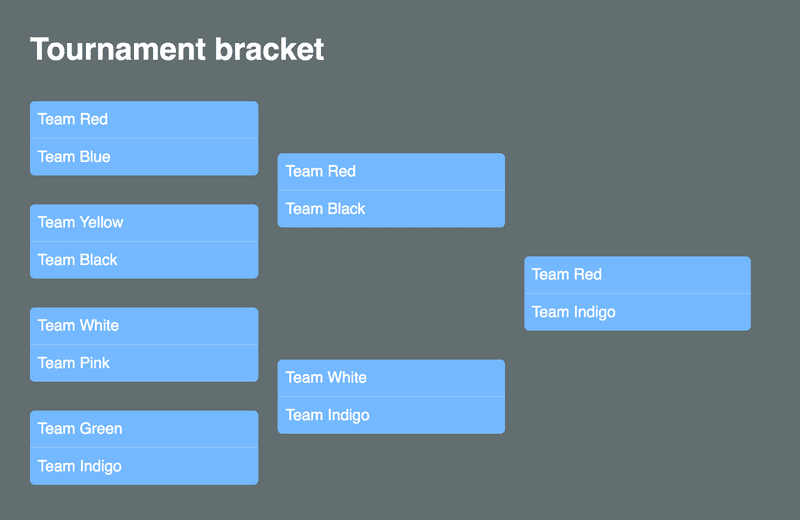
This is what we will be building today:
Simple yet effective and the code to do this is very simple, lets start out with the HTML part. To get started you first need to decide how many spots your bracket should be able to take, this will decrease with half as much for each round, for example if you're going to have 8 teams, you will need to have 3 rounds to pick a winner as every "match" will consist of two teams, again look at my picture above to understand.
So, this bracket will hold 8 teams, therefore we need to create 3 rounds, but first lets wrap the bracket in a div and give it a class named simply bracket
<div class='bracket'>
	<div class='round'></div>
	<div class='round'></div>
	<div class='round'></div>
</div>
and the CSS for these two classes:
.bracket {
	display: flex;
}

.round {
	flex: 1;
	display: flex;
	margin-right: 30px;
	flex-direction: column;
	justify-content: space-around;
}
The key parts here is flex-direction and justify-content you can add your own custom styles to the round but I prefer just to have them transparent.
Next we will add the matches for each round, our tournament would consist of 8 participants, therefore as this is a win or go home tournament, we will create 4 matches with 2 teams inside each match for the first round.
This is how one match div will look like
<div class="match">
	<div class="team">Team Red</div>
	<div class="team">Team Blue</div>
</div>
the second round will, as teams get knocked out of the tournament only contain 2 matches, with 2 teams inside each match. This will give us a total of 4 teams that made it to the semi finals.
and the last round, the grand finale, will as you might guess, only contain 1 match with 2 teams inside each match.
So to be able to recreate my bracket from the top, this is the full HTML code:
<div class="bracket">
	<div class="round">
		<div class="match">
			<div class="team">Team Red</div>
			<div class="team">Team Blue</div>
		</div>
		<div class="match">
			<div class="team">Team Yellow</div>
			<div class="team">Team Black</div>
		</div>
		<div class="match">
			<div class="team">Team White</div>
			<div class="team">Team Pink</div>
		</div>
		<div class="match">
			<div class="team">Team Green</div>
			<div class="team">Team Indigo</div>
		</div>
	</div>
	<div class="round">
		<div class="match">
			<div class="team">Team Red</div>
			<div class="team">Team Black</div>
		</div>
		<div class="match">
			<div class="team">Team White</div>
			<div class="team">Team Indigo</div>
		</div>
	</div>
	<div class="round">
		<div class="match">
			<div class="team">Team Red</div>
			<div class="team">Team Indigo</div>
		</div>
	</div>
</div>
and the full CSS to get the blue scheme along with all the vital parts:
body {
	color: #fff;
	margin: 2em;
	background-color: #636e72;
	font-family: helvetica, arial, sans-serif;
}

.bracket {
	display: flex;
}

.round {
	flex: 1;
	display: flex;
	margin-right: 30px;
	flex-direction: column;
	justify-content: space-around;
}

.match {
	margin: 15px 0;
	overflow: hidden;
	border-radius: 5px;
}

.team {
	color: #fff
	padding: 10px 8px;
	background-color: #74b9ff;
}

.team:nth-child(odd) {
	border-bottom: 1px solid #8fc7ff;
}
Now this bracket is very simple, some details you could add to spice it all up is maybe each teams own flag or country flag, maybe add a vs. text and you could add the results of the match too. In the end, the styling is up to your imagination, this is just the plain core but it shows how easily a tournament bracket could be created with flexbox.
I hope you found this tutorial easy to understand and it might have sparked some ideas whenever you're creating a tournament bracket of your own. If you have any more questions or some notes about this short tutorial please highlight me on twitter where my handle is @reppewelander
